
DIY Rain Barrel
Making a rain barrel from a used trash bin is simple. There are many ways to make a rain barrel, and you can find a wealth of videos online to guide you through it, but here are some basic instructions to follow.
Materials:
Utility knife
Mosquito screen/mesh screen
Rain barrel spigot kit (valve spigot, bulkhead fitting, rubber washers, and Teflon tape). These can be purchased at a Hardware store or online at places like Walmart.
Drill with hole saw bit (standard size is often 1¼ inch; check your kit's requirements)
·Cinderblocks or bricks
Safety goggles
For the lid:
Cut a hole in the center of the trash lid where your downspout will empty. (Size will depend on whether you plan on connecting the downspout using a flexible downspout extension or a downspout diverter. If you don’t have a downspout, you can still make a rain barrel that captures water.)
Cover the hole with mosquito screen and secure it in place with waterproof duct tape. This mesh will keep debris from getting into the barrel (which can clog the spigot) and help prevent the water from becoming a breeding ground for mosquitoes.
For the barrel:
Drill a hole 2 to 4 inches above the base of the barrel. (This placement allows you to drain most of the water while leaving enough space at the very bottom for silt, leaves, and debris to settle without clogging the spigot.) Clean off any loose plastic fragments around the hole (sandpaper can help with this).
Attaching the spigot:
To prepare the spigot, wrap Teflon tape clockwise around the spigot's threads 3 to 4 times to ensure a watertight seal.
Slide the rubber washer onto the threaded end of the bulkhead fitting and insert the fitting from the inside of the barrel out through the hole.
Secure the exterior locking nut onto the bulkhead fitting from the outside.
Screw the spigot clockwise into the installed bulkhead fitting. Hand-tighten until it is snug and the outlet is pointing straight down. Avoid over-tightening, which can damage the washers.
Test it out:
Fill the barrel with a few gallons of water to check for leaks. If a leak occurs, ensure the washers are seated flat against the barrel wall. (If you want to use a bead of sealant to reinforce a gasket or plug small gaps, use a high-quality, non-toxic, and UV-resistant 100% silicone.)
For the platform:
You will need to put your rain barrel on a raised platform (about a foot high) to maximize water pressure and to allow a watering can or bucket to fit beneath the spigot. The platform needs to be sturdy enough to hold rainwater (a 55-gallon barrel filled with water weighs around 480 to 500 pounds); stacked cinderblocks or bricks work great for this.
Other considerations:
Link multiple rain barrels together to capture even more water!
Install an overflow hose on your barrel to divert water away from your home’s foundation.
Can’t connect to a downspout? No problem! You can still make a rain barrel that captures water.
In the winter, to prevent freezing damage, empty your rain barrel completely, leave the spigot open, and disconnect it from your downspout. Store the empty barrel upside down in a garage, shed, or sheltered spot outside. Reconnect your regular downspout extension to divert melting snow and water away from your foundation.
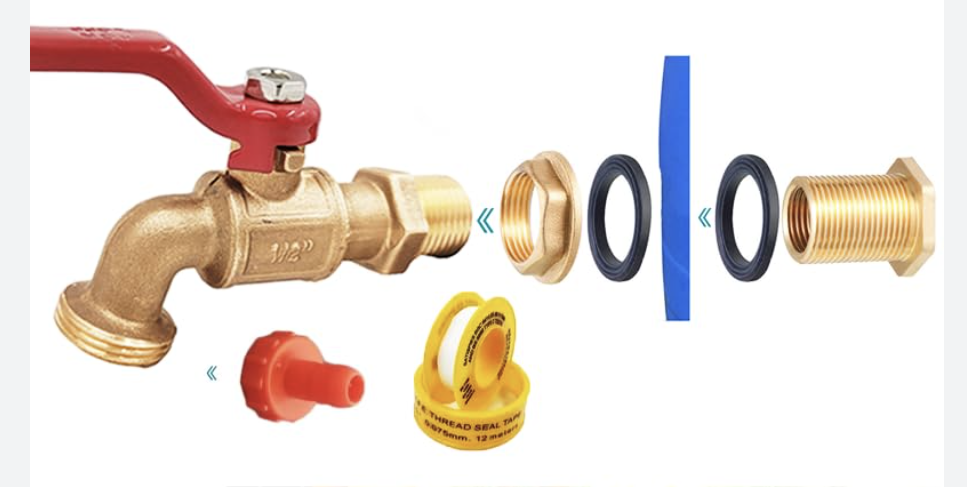
Valve spigot (left) with bulkhead fitting and rubber washers (right). (The blue line represents the barrel.) Teflon tape at bottom.
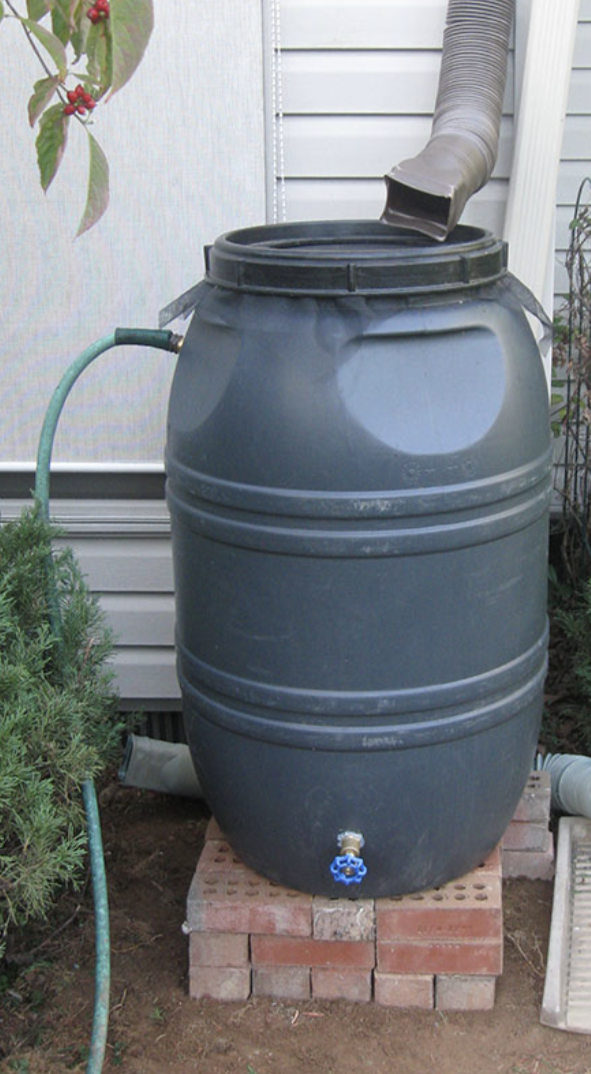
Sample rain barrel.